
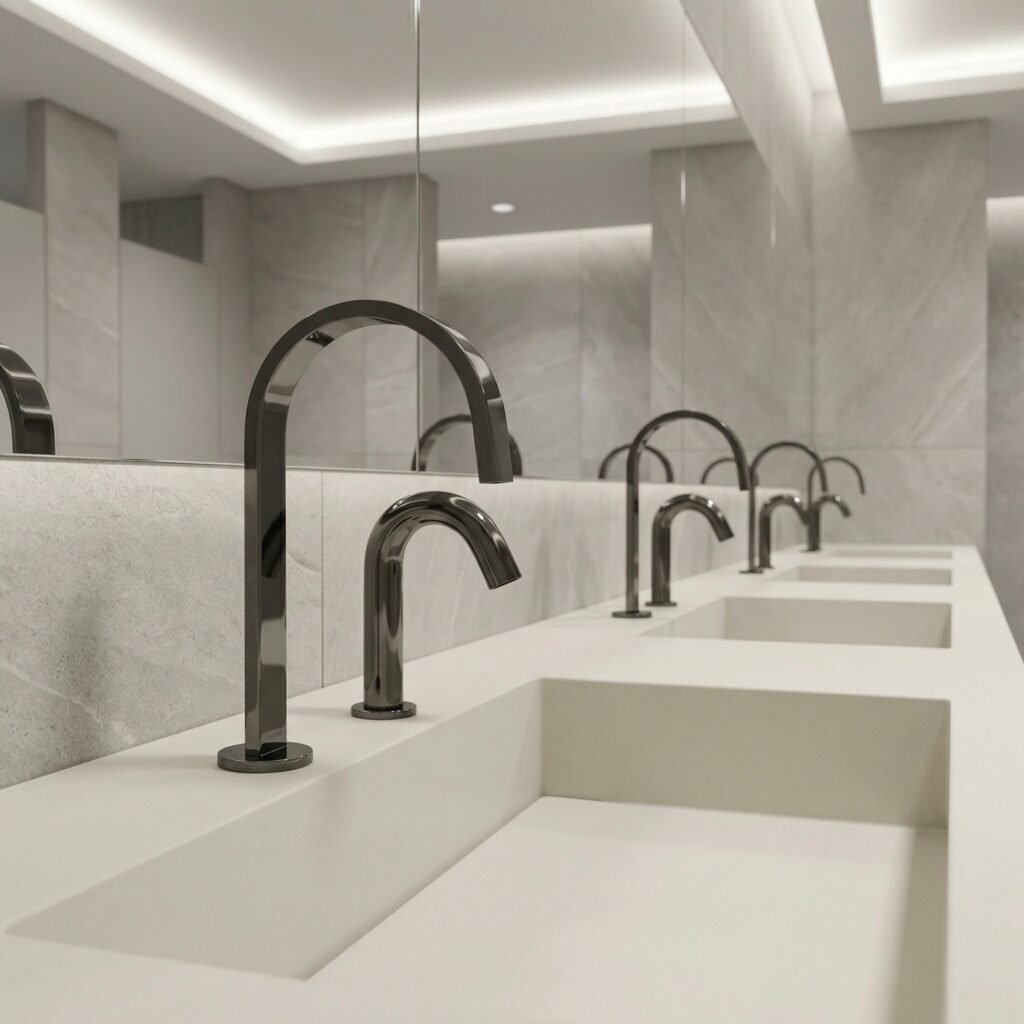
How Should an Automatic Soap Dispenser Spout Be Positioned Relative to the Sink Basin?
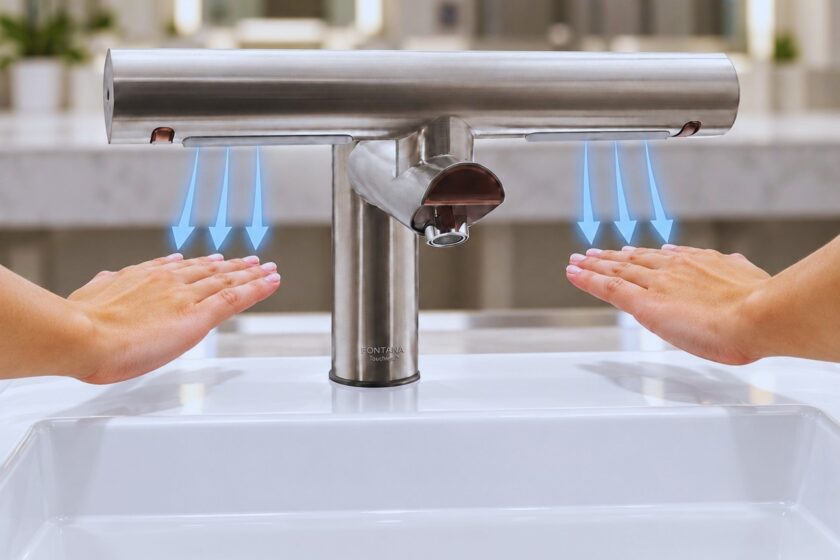
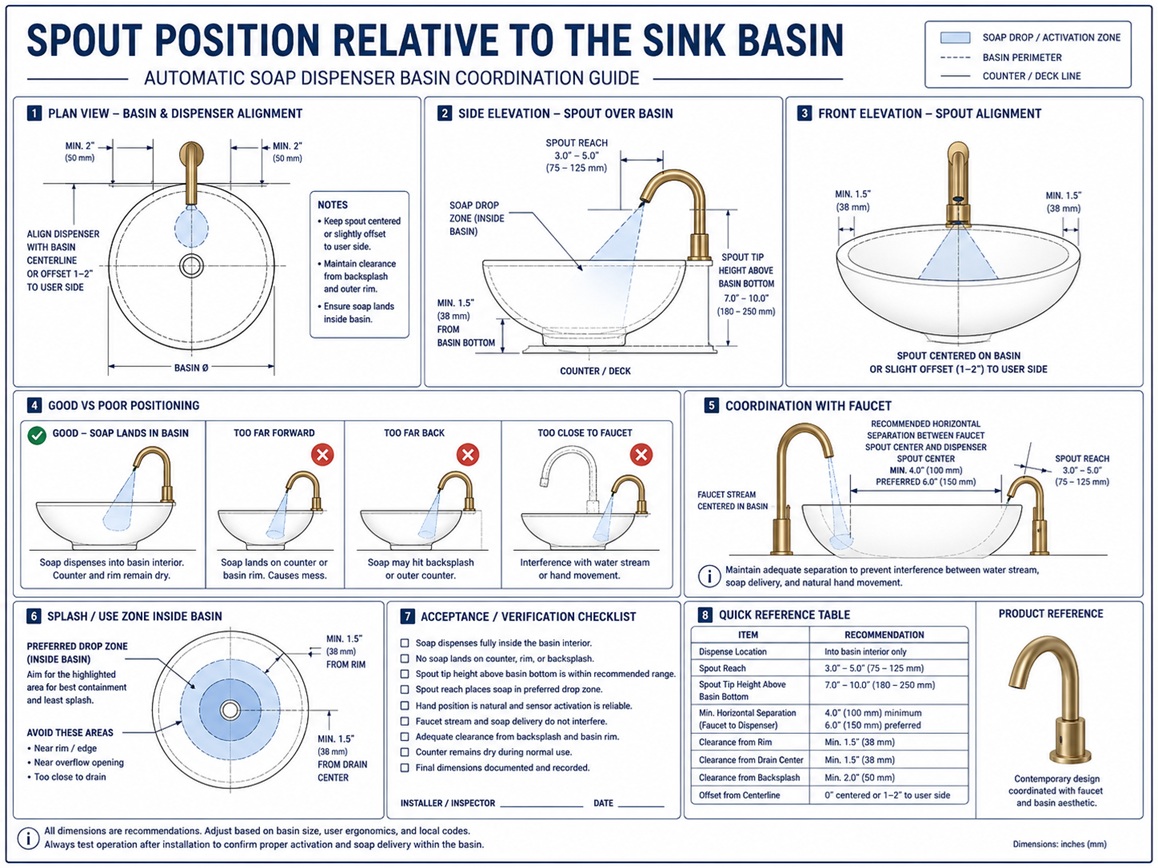
Position the soap outlet so the user can activate the dispenser and receive soap while the hand remains comfortably above the basin interior. The outlet should project beyond the rim, the sensor field should remain clear of nearby surfaces, and normal drips should return to the bowl rather than collect on the countertop or floor.
Primary Position
Locate the outlet above the basin interior so dispensed soap and routine drips are captured by the sink.
Sensor Field
Keep the rim, faucet body, backsplash and reflective counter surfaces outside the manufacturer’s sensing zone.
Hand Position
The user should not need to reach behind the faucet, lean across a deep basin or sharply rotate the wrist.
Model Dimensions
Use the approved product template because mounting-hole offsets, projections and sensor clearances vary by dispenser model.
Place the Dispensing Point Inside the Basin’s Effective Capture Area
The dispenser should deliver soap into the user’s open palm while the hand remains above the bowl. The hand should not need to rest on the countertop or move outside the basin footprint to reach the sensor.
The outlet does not need to align directly above the drain. In most installations, user comfort, clean drainage and separation from the faucet’s water stream are more important than drain-center alignment.
The selected location should place the soap landing point within the bowl while keeping enough distance from the faucet to prevent the user’s hand from unintentionally activating water during soap delivery.
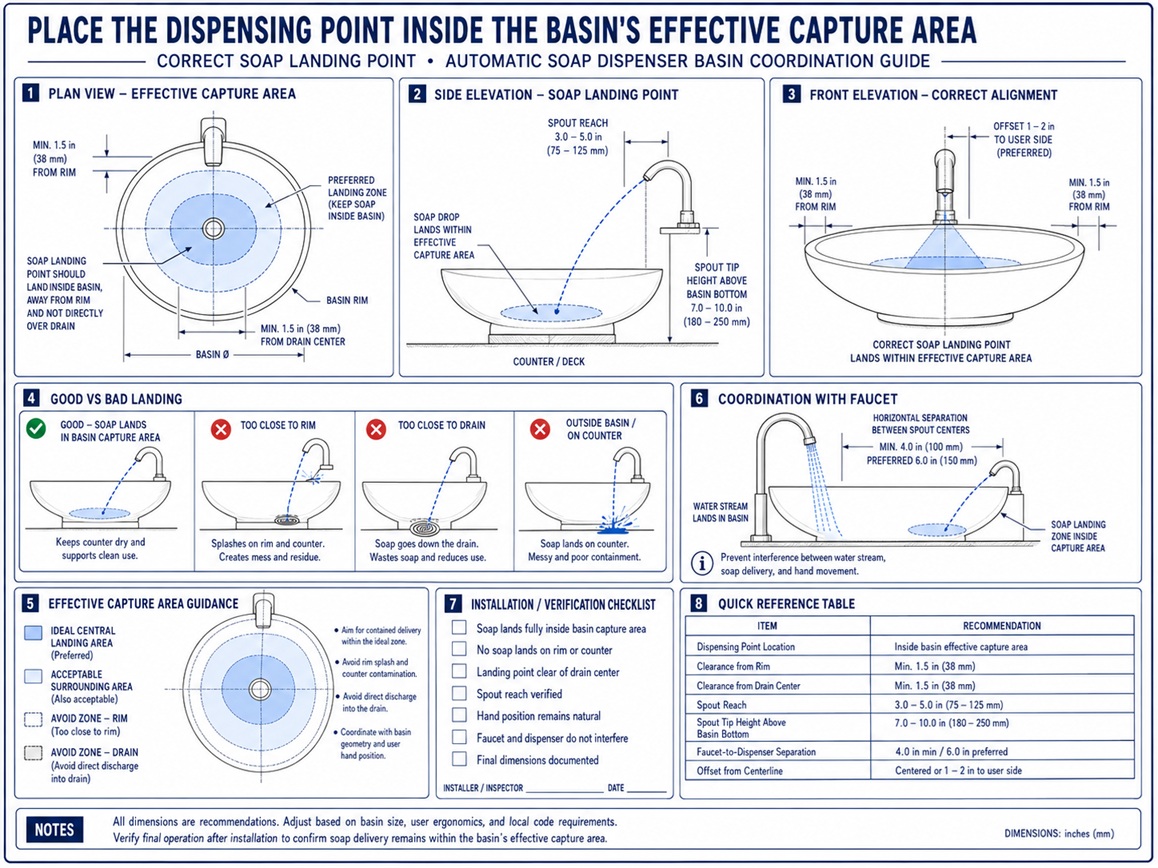
Illustrate the Outlet, Rim, Sensor and Hand Relationship


Treat Published Offsets as Product-Specific Installation Requirements
Some manufacturers provide dimensions such as a mounting-hole offset from the basin rim, a minimum sensor clearance or a recommended center-to-center distance between the faucet and soap dispenser. These numbers should not be applied as universal industry standards.
| Dimension | What it controls | Why it varies | Drawing approach |
|---|---|---|---|
| Mounting hole to basin rim | Determines the starting location of the dispenser assembly. | Spout length, housing shape, sensor location and basin rim geometry differ between products. | Reference the approved manufacturer template and dimension the final hole location after product selection. |
| Outlet projection | Controls where soap leaves the spout relative to the bowl. | Short, standard and extended spouts can have different projections even when their mounting holes are identical. | Show or verify the outlet termination point, not only the mounting-hole centerline. |
| Sensor clearance | Keeps the basin rim, backsplash or counter from creating false or blocked activation. | Sensor direction, wavelength, detection distance and housing angle are model-specific. | Include the manufacturer’s required clearance zone in the coordination detail. |
| Faucet-to-dispenser spacing | Separates user hand paths and reduces sensor interference. | Faucet reach, water-stream location, sensor orientation and basin width differ by system. | Confirm spacing using the selected faucet and dispenser as an integrated lavatory assembly. |
| Counter thickness | Affects shank engagement, fastening and under-counter component placement. | Stone, solid-surface, stainless-steel and composite assemblies have different thicknesses and reinforcement needs. | Confirm allowable thickness before fabrication and coordinate any required under-counter support. |
Adjust the Spout Position to the Selected Sink Type
The same dispenser can behave differently at an undermount basin, integral sink, vessel bowl or multi-user trough. Review the finished rim, bowl opening, deck slope and intended user position before locating the mounting hole.
| Basin type | Preferred relationship | Primary coordination concern | Recommended verification |
|---|---|---|---|
| Undermount basin | Outlet positioned beyond the countertop opening and over the upper interior of the bowl. | The visible countertop edge can be wider than the actual basin rim below. | Verify the finished cutout, reveal and outlet projection using the approved shop drawing. |
| Integral solid-surface basin | Outlet positioned over a sloped surface that drains directly into the bowl. | A broad flat deck or shallow rear slope can retain residual soap. | Review the fabricated cross-section and perform a water-and-soap mockup where possible. |
| Drop-in basin | Outlet projected past the raised rim into the open bowl area. | The raised rim can block the sensor field or intercept the soap stream. | Confirm vertical and horizontal clearance above the finished rim. |
| Vessel sink | Outlet and sensor located where the elevated rim does not block activation or force excessive reach. | High rims, deep counters and rear-mounted dispensers can create a difficult user reach. | Use a full-scale mockup and confirm accessibility before drilling the countertop. |
| Trough lavatory | Each soap outlet aligned with a defined user station and a draining portion of the trough. | Users may activate an adjacent faucet or dispenser when stations are too close together. | Coordinate every station on a dimensioned plan and reflected countertop layout. |


Design the Soap-to-Water Movement as One Continuous Action
The dispenser and faucet should support a clear, predictable sequence. The user receives soap, moves the hands toward the water stream and begins washing without crossing fixtures, reaching behind the faucet or activating the wrong sensor.
Approach
The user approaches the lavatory and can immediately identify the soap and water locations.
Activate Soap
An open palm enters the soap sensor field while remaining above the basin.
Receive Soap
The measured dose lands within the palm without contacting the faucet, rim or countertop.
Move to Water
The hands move naturally toward the faucet sensor and water stream without an unnecessary change in posture.
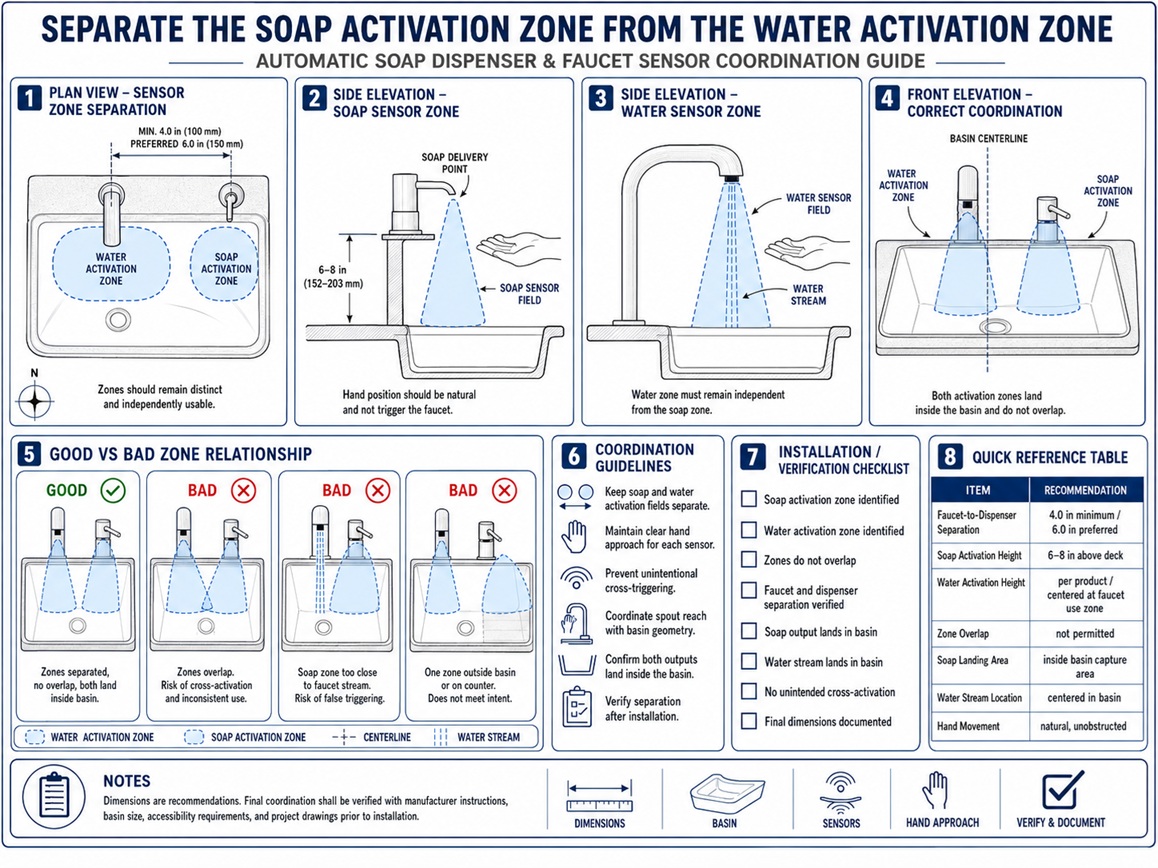
Separate the Soap Activation Zone From the Water Activation Zone
A dispenser can be correctly located over the basin and still perform poorly if the user’s hand triggers the faucet while receiving soap. The faucet and dispenser sensors should be reviewed together using their published sensing directions and detection ranges.
Spacing should also allow the user to move naturally from soap to water. Excessive separation can make the sequence inconvenient, while insufficient separation can cause unintended activation and confusing hand placement.
- Confirm the centerline and outlet location of both devices.
- Identify the actual sensing angle of the faucet and dispenser.
- Keep reflective surfaces from redirecting infrared signals.
- Check the water stream against the intended soap hand position.
- Test operation with wet and dry hands under normal restroom lighting.
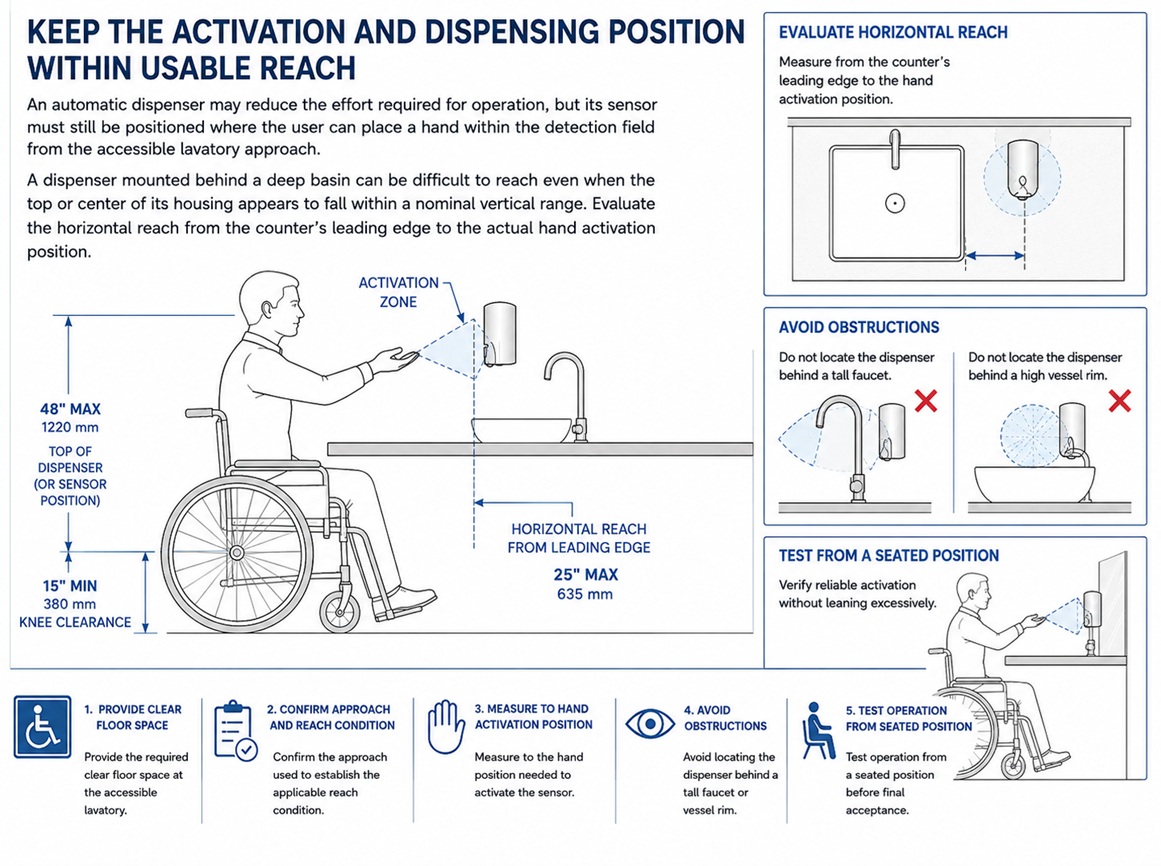
Keep the Activation and Dispensing Position Within Usable Reach
An automatic dispenser may reduce the effort required for operation, but its sensor must still be positioned where the user can place a hand within the detection field from the accessible lavatory approach.
A dispenser mounted behind a deep basin can be difficult to reach even when the top or center of its housing appears to fall within a nominal vertical range. Evaluate the horizontal reach from the counter’s leading edge to the actual hand activation position.
- Provide the required clear floor space at the accessible lavatory.
- Confirm the approach used to establish the applicable reach condition.
- Measure to the hand position needed to activate the sensor.
- Avoid locating the dispenser behind a tall faucet or vessel rim.
- Test operation from a seated position before final acceptance.
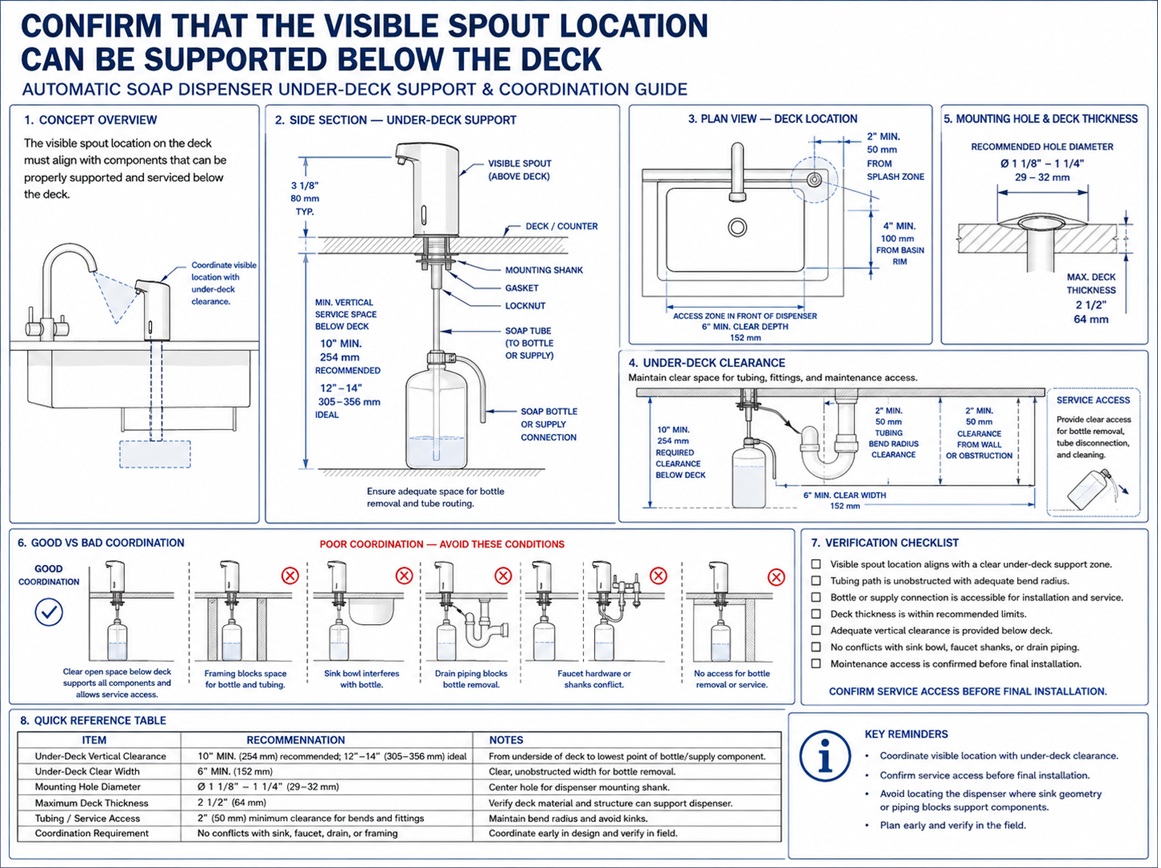
Confirm That the Visible Spout Location Can Be Supported Below the Deck
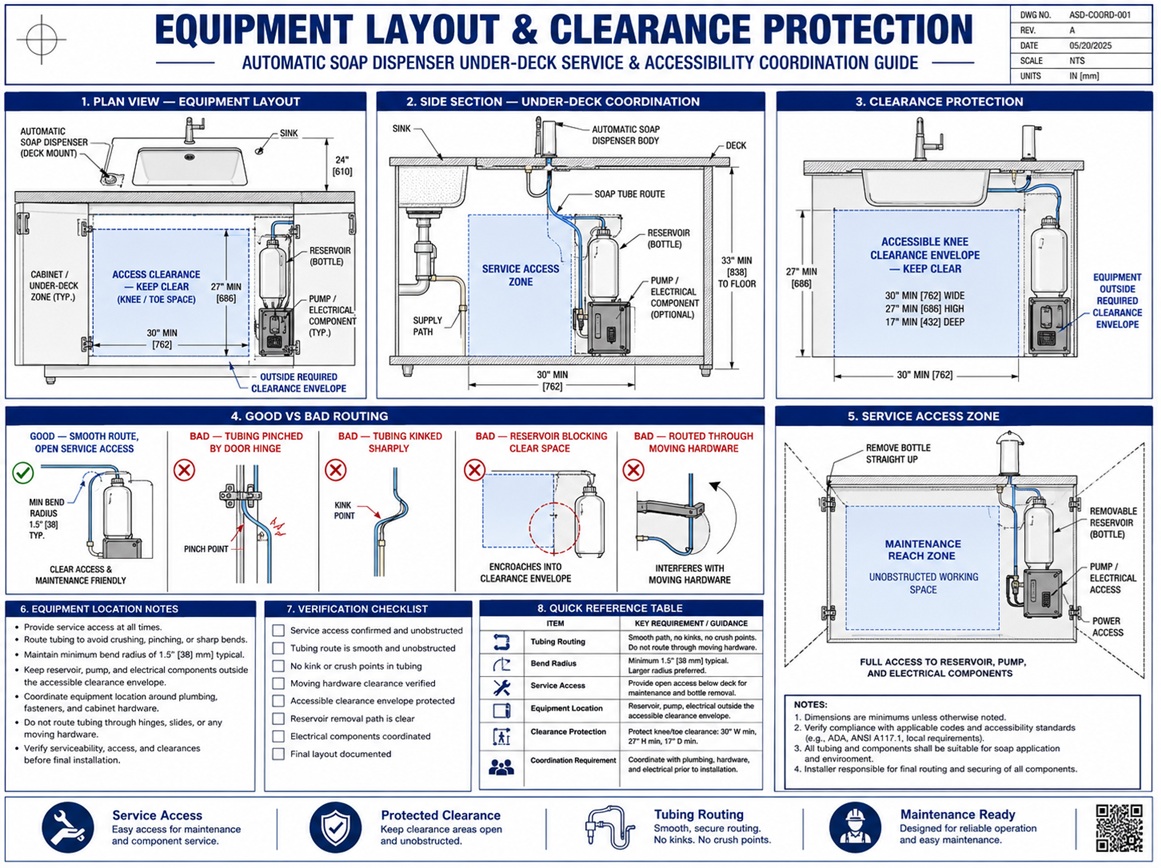
The preferred location above the basin may conflict with sink clips, structural frames, supply piping, drains, electrical boxes, faucet components or required knee and toe clearance below the counter. Review both sides of the countertop before releasing the drilling layout.
User-Side Requirements
- Spout projection over the basin interior.
- Clear sensor field beneath or near the outlet.
- Natural palm position above the bowl.
- Separation from the faucet and water stream.
- Cleanable joints around the mounting location.
Service and Clearance Requirements
- Mounting shank and retaining hardware.
- Soap tubing and minimum bend radius.
- Pump, control module and power supply.
- Reservoir or refill connection.
- Required accessible knee and toe clearance.
Resolve the Location Before the Countertop Is Drilled
Select Products
Confirm the final basin, faucet and automatic soap dispenser models and obtain current technical documents.
Overlay Templates
Combine the basin cutout, faucet drilling and dispenser template on one coordinated countertop plan.
Review Clearances
Check the sensor field, outlet projection, hand path, under-counter equipment and accessible reach.
Approve Shop Drawing
Release the countertop only after the coordinated drilling dimensions and equipment layout are approved.
Verify These Items Before Issuing the Lavatory Detail
- Confirm the final dispenser manufacturer and model.
- Obtain the approved drilling and installation template.
- Identify the outlet termination point.
- Identify the sensor location and sensing direction.
- Confirm the finished basin rim or countertop opening.
- Place the soap landing point within the bowl.
- Keep the basin rim outside the sensor field.
- Confirm the expected residual drip path.
- Coordinate faucet and dispenser sensor zones.
- Verify the user’s soap-to-water hand movement.
- Confirm accessible horizontal and vertical reach.
- Protect required knee and toe clearance.
- Check sink clips and countertop reinforcement.
- Coordinate soap tubing, pump and reservoir locations.
- Provide access for refill and maintenance.
- Require post-installation sensor and dispensing tests.
Avoid These Frequent Spout-Positioning Problems
Soap Lands on the Counter
The outlet does not project far enough beyond the rim, or the spout has rotated away from the bowl after installation.
Rim Blocks the Sensor
The basin edge or raised vessel rim occupies the detection zone and prevents reliable hand sensing.
False Soap Activation
A reflective surface, moving water or nearby fixture falls within the sensor field and triggers unwanted dispensing.
Faucet Activates Too Early
The soap hand position overlaps the faucet sensor field, causing water to start before the user moves toward the stream.
Difficult Accessible Reach
The dispenser is placed behind a deep basin, tall faucet or raised rim and cannot be comfortably reached from the accessible approach.
Spout Rotates Out of Position
Insufficient fastening, missing anti-rotation hardware or improper counter preparation allows the outlet to turn toward the deck.
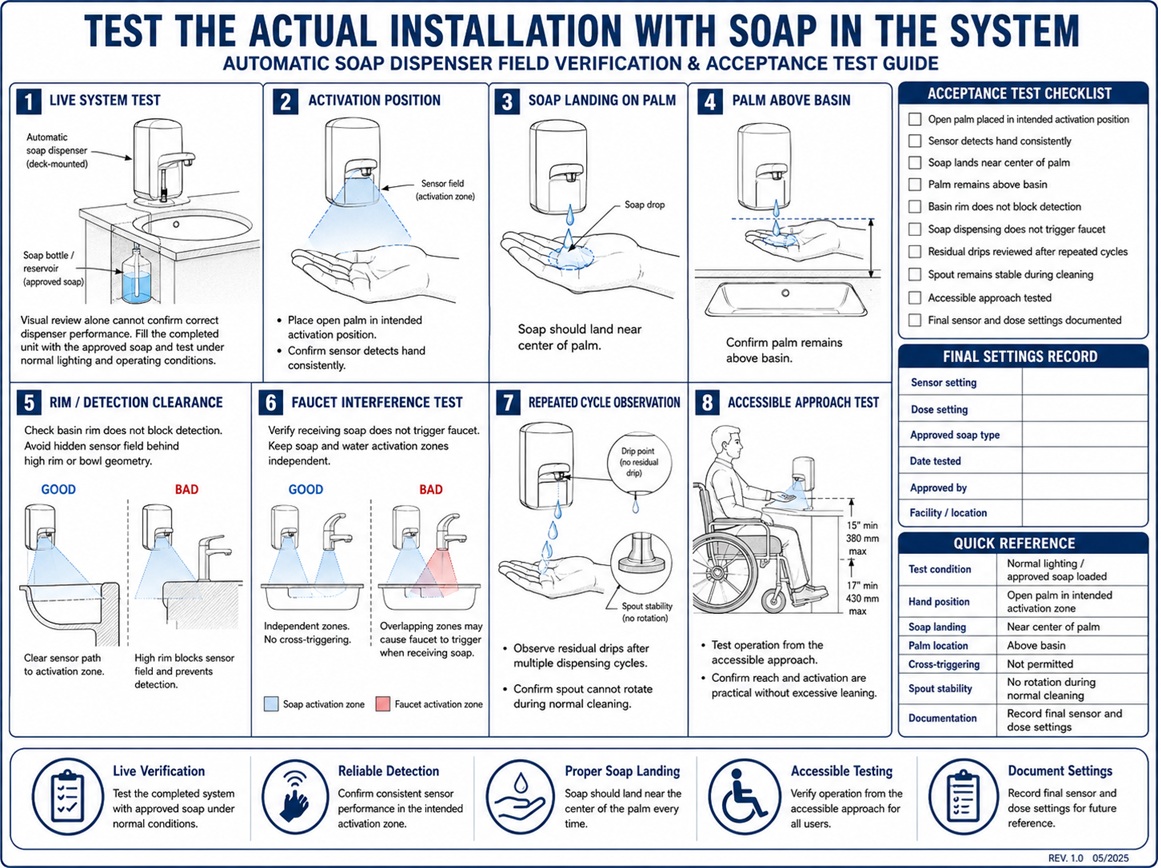
Test the Actual Installation With Soap in the System
A visual review alone cannot confirm correct dispenser performance. The completed unit should be filled with the approved soap and tested under normal lighting and operating conditions.
Acceptance Test
- Place an open palm in the intended activation position.
- Confirm that the sensor detects the hand consistently.
- Verify that soap lands near the center of the palm.
- Confirm that the palm remains above the basin.
- Check that the basin rim does not block detection.
- Verify that receiving soap does not trigger the faucet.
- Observe residual drips after multiple dispensing cycles.
- Confirm the spout cannot rotate during normal cleaning.
- Test operation from the accessible approach.
- Document final sensor and dose settings for maintenance staff.
Use a Performance-Based Spout-Location Note
The note should define the required performance while directing the installer to use the approved product template and coordinated countertop shop drawing.
Automatic Soap Dispenser Position
Locate the automatic soap dispenser so the outlet projects over the lavatory bowl and dispenses soap into the user’s open hand while the hand remains above the basin interior. Keep the basin rim, faucet, backsplash and adjacent surfaces outside the manufacturer’s required sensor clearance zone. Coordinate the mounting hole, outlet projection, faucet spacing, sensor fields, countertop thickness, basin geometry, under-counter equipment, accessible reach and required knee and toe clearance before countertop fabrication. Secure the dispenser against rotation and field-test hand detection, soap landing point, residual dripping, faucet interaction and accessible operation before final acceptance.
Soap Dispenser Spout Position FAQ
Should the soap dispenser outlet be directly over the drain?
Not necessarily. The preferred location is determined by the user’s hand position, soap landing point, faucet relationship and basin drainage. The outlet can be offset from the drain when soap and residual drips remain within the bowl.
How far should the soap dispenser be from the basin rim?
There is no single dimension that applies to every model. Use the selected manufacturer’s installation template and confirm that the outlet projects over the bowl while the rim remains outside the sensor field.
How far should the soap dispenser be from the faucet?
The spacing depends on the faucet reach, water-stream location, sensor direction, dispenser projection and basin width. Follow the manufacturer’s guidance and test both sensor zones together.
Can an automatic dispenser be installed behind a vessel sink?
It may be possible when the outlet projects beyond the raised rim, the rim does not obstruct the sensor and the activation position remains within accessible reach. A full-scale mockup is advisable.
Why is soap landing on the countertop?
Possible causes include insufficient spout projection, incorrect mounting-hole placement, spout rotation, excessive dispensing velocity, unsuitable soap viscosity, delayed valve closure or a leaking outlet.
Why does the dispenser activate without a hand beneath it?
The basin rim, backsplash, reflective counter, moving water or another object may occupy or reflect into the sensor field. Recheck the required clearance and approved sensor setting.
Can the spout be positioned beside the basin instead of over it?
That arrangement generally increases countertop contamination and floor-drip risk. Positioning the outlet over the basin interior is preferred unless a manufacturer-approved integrated system provides another controlled drainage method.
What should be checked after installation?
Check hand detection, soap landing point, residual dripping, spout rotation, faucet interaction, accessible reach, refill access and under-counter equipment clearances.